Moving a WordPress site to a new domain can seem daunting, but it’s a manageable process with the right approach. This guide will walk you through how to copy a WordPress website to another domain easily.
Before You Begin:
Backup your site: Always create a complete backup of your existing site before starting.
Choose a downtime window: Plan to do this during low-traffic periods.
Gather credentials: Have FTP/SFTP, database, and hosting control panel logins ready.
Key Takeaways
Choose the right migration method based on your technical comfort: plugins like Duplicator for beginners, manual migration for advanced users, or managed hosting tools for convenience.
Always create complete backups before starting and perform essential post-migration tasks like updating permalinks, clearing cache, and testing all site functionality.
Plan your migration during low-traffic periods and have all necessary credentials (FTP, database, hosting) ready to minimize downtime and troubleshooting issues.
How We Can Help?
Make your WordPress migration seamless and stress-free by trusting REDLUMB to move your website to a new domain with zero hassle and complete peace of mind.
Method 1: Using a Migration Plugin
This is the easiest approach for most users.
You can easily install a plugin on your website.
Step 1: Install a Migration Plugin
Popular options include:
Duplicator (free and pro versions)
All-in-One WP Migration (free for smaller sites)
UpdraftPlus (with migrator add-on)
Step 2: Create a Site Package
Using Duplicator as an example:
Install and activate Duplicator on your source site.
Go to Duplicator → Packages → Create New.
Run the site scan and create the package. (contains two files: installer.php and archive.zip)
Step 3: Prepare the New Domain
Purchase hosting for your new domain.
Set up a new database and user.
Make a note of the database credentials.
Step 4: Upload and Extract
Upload both Duplicator files to the root directory of your new domain via FTP/SFTP.
Navigate to yourdomain.com/installer.php in your browser.
Follow the installation wizard:
Accept the terms.
Test the database connection using your new credentials.
Update site URLs from the old domain to the new.
Install the site.
Step 5: Test and Verify
Check that your new site works correctly.
Verify that all pages load properly.
Test contact forms and other functionality.
Method 2: Manual Migration
For advanced users who prefer direct control.
Step 1: Export Database
Access phpMyAdmin on your source hosting.
Select your WordPress database.
Click “Export” and choose “Custom” for more options.
Select all tables and export as SQL.
Step 2: Download WordPress Files
Connect to your source site via FTP/SFTP.
Download all WordPress files and folders from the root directory.
Step 3: Create New Database
Access your new hosting’s database manager.
Create a new database and user.
Assign all privileges to this user.
Step 4: Modify wp-config.php
Open wp-config.php from your downloaded files.
Update the database name, username, password, and host.
define(‘DB_NAME’, ‘new_database_name’);
define(‘DB_USER’, ‘new_username’);
define(‘DB_PASSWORD’, ‘new_password’);
define(‘DB_HOST’, ‘localhost’); // or as provided by your host
Info
When modifying your wp-config.php file, create a backup copy first. If your hosting environment uses a different database configuration than the standard “localhost” setup, you might need to ask your hosting provider for the exact DB_HOST value. Some hosts use specific ports or socket paths. Also, consider temporarily enabling the WP_DEBUG constant (set to true) during migration to catch any errors, but remember to disable it once your migration is complete and the site is working properly.
Step 5: Upload Files
Connect to your new domain via FTP/SFTP.
Upload all WordPress files to the root directory.
Step 6: Import Database
Access phpMyAdmin on your new hosting.
Select your new database.
Click “Import” and upload the SQL file from Step 1.
Replace all instances of your old domain with the new one.
Be sure to include variations. (http://, https://, www., non-www)
Method 3: Using Managed Hosting Tools
Many managed WordPress hosts offer migration services or tools.
Contact your new host’s support team.
Provide access to your current site.
Let them handle the migration.
Verify everything works post-migration.
Post-Migration Tasks
Regardless of which method you choose:
Update permalink structure: Go to Settings → Permalinks and save. (even if unchanged)
Clear cache: Purge any caching plugins on your new site.
Test all functionality: Forms, payments, memberships, etc.
Check media files: Ensure images and videos display correctly.
Update DNS settings: Point your domain to the new hosting.
Set up SSL certificate: Ensure HTTPS works properly.
Update external services: Google Analytics, Search Console, CDN, etc.
Troubleshooting Common Issues
Mixed content warnings: Check for hardcoded HTTP URLs in your content.
Missing images: Verify media paths were correctly updated.
Broken links: Run a broken link checker.
Login issues: Reset passwords if necessary.
Plugin conflicts: Deactivate and reactivate plugins one by one.
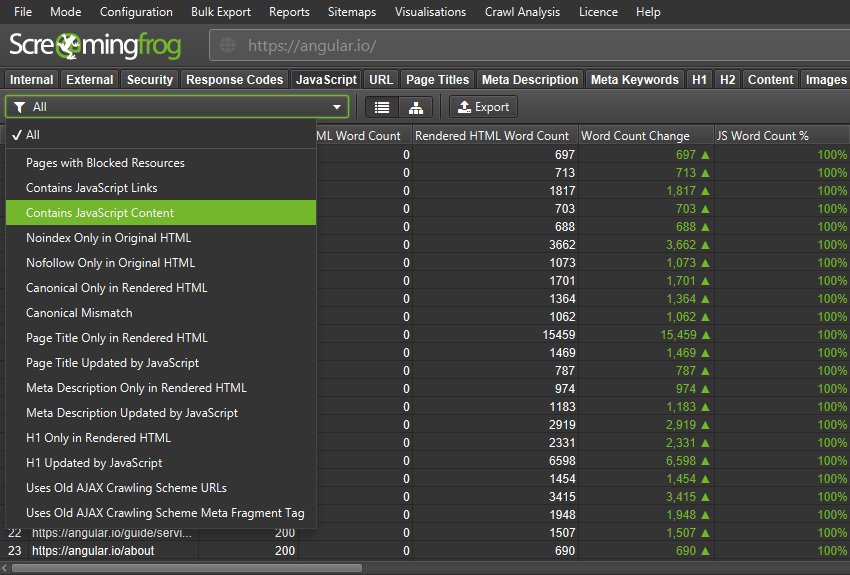
You can also audit your website on Screamingfrog to fix broken links.
Apart from duplicating a page or editing a footer in WordPress, migrating a website requires careful planning, but it isn’t as complex as it may seem. You can consider hiring WordPress experts or using your host’s migration service for critical sites. Always maintain backups throughout the process in case anything goes wrong.
By following these steps, you’ll have successfully copied your WordPress website to another domain while minimizing downtime and preventing data loss.